Deployment Manual
Running the App Locally
Prerequisites:
- git
- npm or yarn
1. General Installation

2. Install and Configure PostgreSQL
Installing PostgreSQL, here is how you would do it on Ubuntu (instructions for other OS are here):

Create a new user:

Exit out of the
postgres user by running exit on the command line. Run psql -d postgres as the current user and add a password:
Create a database called
application:
To create the schema run:

3. Setting Environment Variables
Navigate to the server directory and create a .env file and populate it as follows:
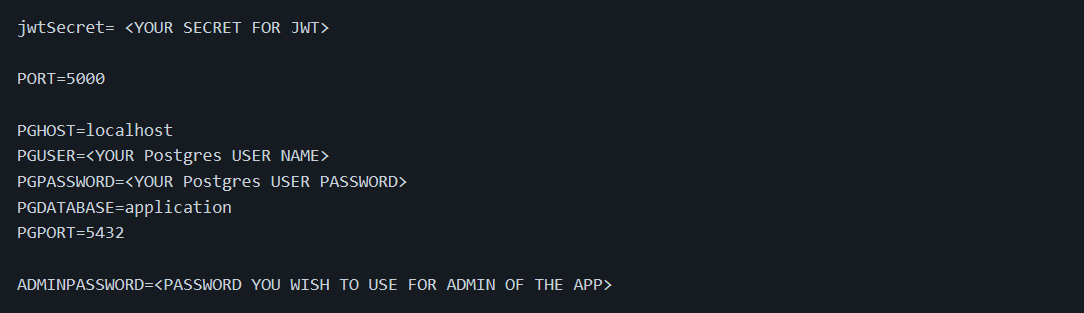
Now we can start both the server and the client.
To start the server run
npm run dev from the server directory and run npm start from the client directory to start the client.Now you can navigate to http://localhost:3000/ on your browser and login as an admin (admin@admin.com) and using your password set in
.env.Admin can register new clinicians and patients.
Once you have at least one patient registered, you can simulate the infusion pump by setting up the cronjob to run
genFeeds.py every 20-30 mins.But first, make sure you run
pip install -r requirements.txt from the server directory.You can now setup your cronjob as follows. Run
crontab -e and add the following line at the bottom to run the script every 30 minutes:*/30 * * * * /usr/bin/python3 <YOUR FULL PATH>/server/genFeeds.pyAlternatively, if you want to view all the functionality of the app by populating the patients with their feeds and weights, you can do so without a cronjob. Simply run:

Deploying the Application on Ubuntu VPS (AWS, Digital Ocean and etc.)
1. Startup
After you ssh to the VPS, follow all the steps above. However, create the .env file outside of your application directory (you can optionally add NODE_ENV=production environment variable). Once .env file is populated, add the following line to the bottom of /home/<USER NAME>/.profile file:
set -o allexports; source <path_to_env>/.env; set +o allexport
This makes sure that the environment variables persist.
Next, you need to install pm2, by running sudo npm install pm2 -g.
To start pm2, run pm2 start <path_to_server>/server/index.js --name nhs-dashboard.
Configure pm2 to automatically startup the process after a reboot, run pm2 startup and copy the sudo env PATH=... line and paste and run it in the terminal. Finally run pm2 save.
2. Build the react app
Navigate to the client, and run npm run build.
3. Install and configure Nginx

Navigate to
/etc/nginx/sites-available.Create a file with the name of your domain.
sudo cp default <your domain name>, in my case it would be sudo cp default dauletbatayev.com.Open the file we just created and modify it so it looks like this:
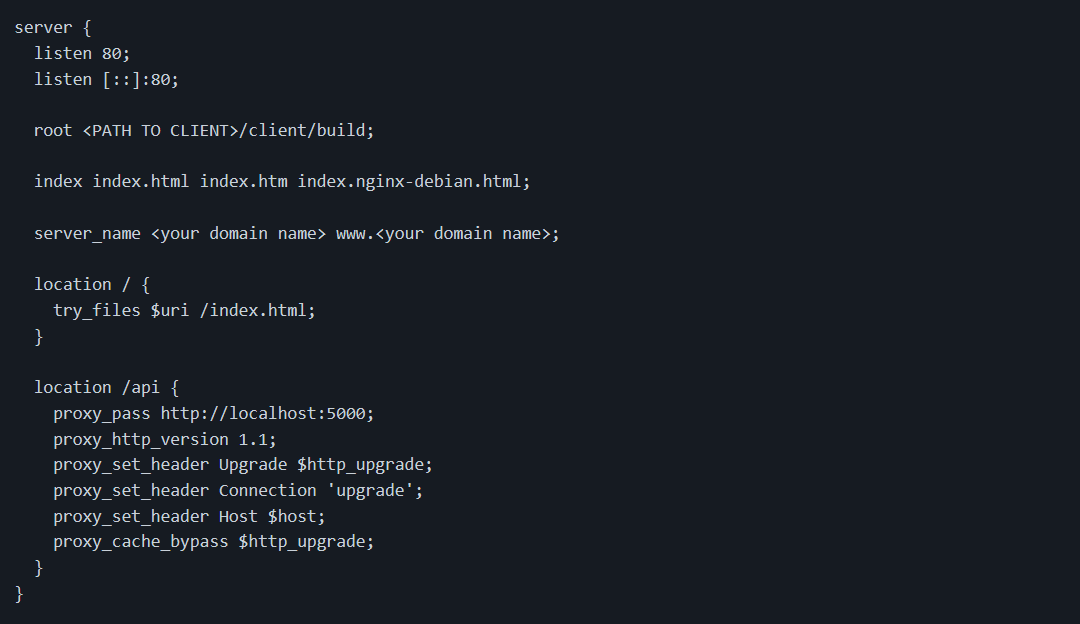
Enable the new site

Congratulations, your application is deployed and can be accessed at the domain name you have set.
Legal Statement
Our application is Licensed under GNU Affero General Public License v3.0.
You can find detailed information about the License by following the link below:
https://github.com/COMP0016-Team6/NHS-Patient-Dashboard/blob/master/LICENSE
| Library/Tool/Framework | Accessible at | License Type |
| React | https://reactjs.org/ | MIT |
|---|---|---|
| Redux | https://redux.js.org/ | MIT |
| Material-UI | https://material-ui.com/ | MIT |
| Bootstrap | https://getbootstrap.com/ | MIT |
| Cypress | https://www.cypress.io/ | MIT |
| Istanbul Nyc | https://istanbul.js.org/ | ISC |
| Chart.js | https://www.chartjs.org/ | MIT |
| React-toastify | https://github.com/fkhadra/react-toastify#readme | MIT |
| Docker | https://www.docker.com/ | Apache-2.0 |
| Node | https://nodejs.org/ | MIT |
| Express | https://expressjs.com/ | MIT |
| JSONWebToken | https://self-issued.info/docs/draft-ietf-oauth-json-web-token.html | MIT |
| Node Bcrypt | https://github.com/kelektiv/node.bcrypt.js | MIT |
| Node-fetch | https://github.com/node-fetch/node-fetch | MIT |
| Nodemon | https://nodemon.io/ | MIT |
| PostgreSQL | https://www.postgresql.org/ | The PostgreSQL Global Development Group |
| Python | https://www.python.org/ | Python Software Foundation-2.0 |